Effortless Replacement of Grammer Driver Seat Cushions: A Simple Guide
Introducing our comprehensive guide on the effortless replacement of Grammer Driver Seat Cushions, designed to enhance your driving experience. In the world of long-haul trucking, agricultural machinery operation, or any profession that requires extended hours behind the wheel, comfort is most important. Grammer, a renowned name in ergonomic seating solutions, understands this need for comfort and durability.
Discover how to upgrade your Grammer Driver Seat Cushions for ultimate comfort. We'll guide you on cushion replacement, and when to consider a chair upgrade. Whether you're a professional driver or seeking improved seating, this guide has you covered.
Efficient Steps for Upgrading Your Grammer Driver Seat Cushions
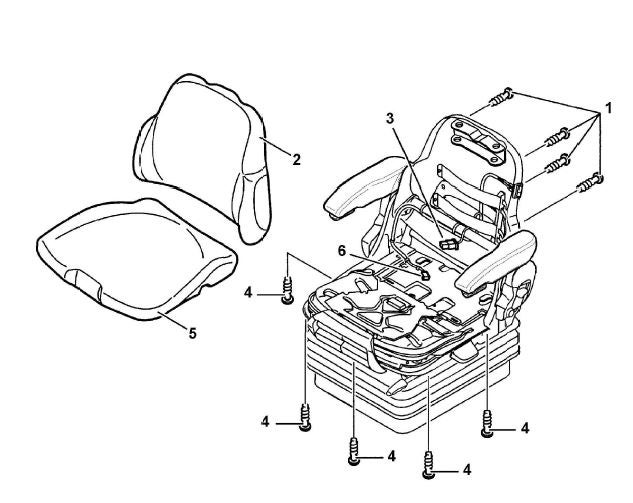 (1) Screw
(2) Backrest Cushion
(3) Backrest Cushion Plug Connection
(4) Screw
(5) Seat Cushion
(6) Seat Cushion Plug Connection
(1) Screw
(2) Backrest Cushion
(3) Backrest Cushion Plug Connection
(4) Screw
(5) Seat Cushion
(6) Seat Cushion Plug Connection Step 1: Unscrew the Screws
Begin by unscrewing the screws (1) securing your Grammer Driver Seat Cushions in place. These screws hold the cushions and backrest in position.
Step 2: Disconnect Seat Heating (If Applicable)
If your seat comes equipped with seat heating, gently pull the backrest cushion (2) slightly forward. This will allow you to access the plug connection between the backrest cushion (3) and the seat heating element. Disconnect this plug connection to ensure a safe removal process.
Step 3: Remove Backrest Cushion
With the plug disconnected, you can now proceed to remove the backrest cushion (3) from the seat. This step is essential to access the cushions for replacement or maintenance.
Step 4: Remove Front Screws (No Length or Tilt Adjustment)
If your Grammer seat lacks seat length and tilt adjustment features, you'll need to remove the three front screws (4) securing the seat cushions. These screws hold the cushions in place and must be removed for cushion replacement.
Step 5: Remove Side Screws (With Seat Length and Tilt Adjustment)
For seats with seat length and tilt adjustment, you'll find four side screws (4) holding the cushions in position. Unscrew these side screws to facilitate the removal of the cushions.
Step 6: Remove Seat Cushion (If Applicable)
If your Grammer seat includes a separate seat cushion (Step 5), you can now remove it. This is a key step in the cushion replacement process.
Step 7: Installation
Reinstalling your Grammer Driver Seat Cushions is carried out in reverse order. Follow the above steps in reverse to securely attach the new cushions and backrest, ensuring you restore the comfort and functionality of your driver's seat. Remember to tighten the fixation screws for the cushions to a torque of 3.5 Newton-meters (Nm) for proper securement.
Following these clear and concise steps will help you effortlessly replace your Grammer Driver Seat Cushions and ensure a comfortable driving experience.
Explore More Resources for Your Grammer Tractor Seat
For a comprehensive guide to maintaining and servicing your Grammer tractor driver seat, including a handy checklist, check out our article: [Grammer Tractor Driver Seats - A Handy Checklist for Repairs and Servicing], a resource we developed in collaboration with Grammer. And for additional tips on optimizing your comfort in the field, don't miss our article: [GRAMMER tractor seats – 3 Tips to be Comfortable in the Field].
Expert Insights on Replacement of Grammer Driver Seat Cushions
We only gain expertise in any topic by learning, either by trial and error or through training. Always consult the manufacturer’s guide. You could also speak with your Kramp product specialist or find a Kramp dealer near you.