Are the V-Belts of your machine due for replacement? Replacing a V-Belt is relatively easy for an agricultural company, someone with a large vehicle fleet or a DIY-techie. There are a number of points you need to keep in mind: calculation, pre-tensioning, alignment and the drive. The wrong tension or adjustment can lead to problems and unnecessary damage. Here is a brief explanation of what to keep in mind when replacing a V-Belt.
Point 1: Alignment of Belt Pulleys
One of the trickier parts when replacing V-Belts is the alignment of the pulleys. A vertical or horizontal angle alignment error or parallel alignment error can occur during this stage. To avoid these mistakes, we recommend using a laser alignment device: the laser point makes alignment a lot easier!
Horizontal Alignment of the Shafts
Ensure the horizontal alignment of the shafts is correct: a maximum deviation of 0.5° is permitted. During alignment of the belt pulleys, regularly check that the pre-tensioning of the V-Belt is not too high or too low.

Vertical Alignment of the V-Grooved Pulleys
Please note: The alignment of belt pulleys with a V-groove is checked before and after tightening the conical bushings with the alignment rail.
Point 2: The Initial Installation
Install the V-Belts without using force. Installation using screwdrivers, nail guns, pry bars or other 'heavy gear' can result in premature damage to the V-Belt. Make sure you install the V-Belt with patience and care: this will save you time and money later!
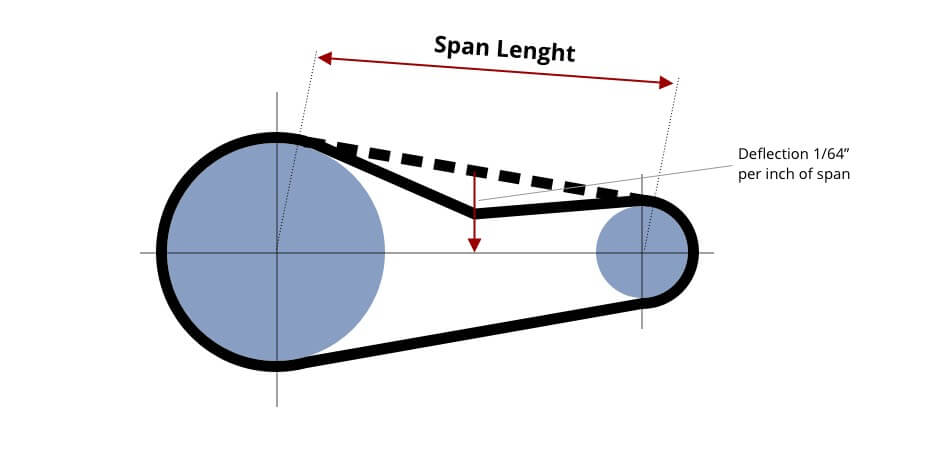
Point 3: Belt Tensioning
To measure the pre-tensioning (OPKR1 – OPKR2 – OPKR3) and ensure that the V-Belt is installed with the correct pre-tensioning, it is recommended that you research this aspect carefully. On this page of the Kramp web shop, under the Media tab you will find the desired pre-tensioning for each type of V-Belt in combination with suitable belt pulleys. After setting the tension, let the V-Belt run for a few hours and check and adjust the tension if needed. (Length is spelled wrong here).
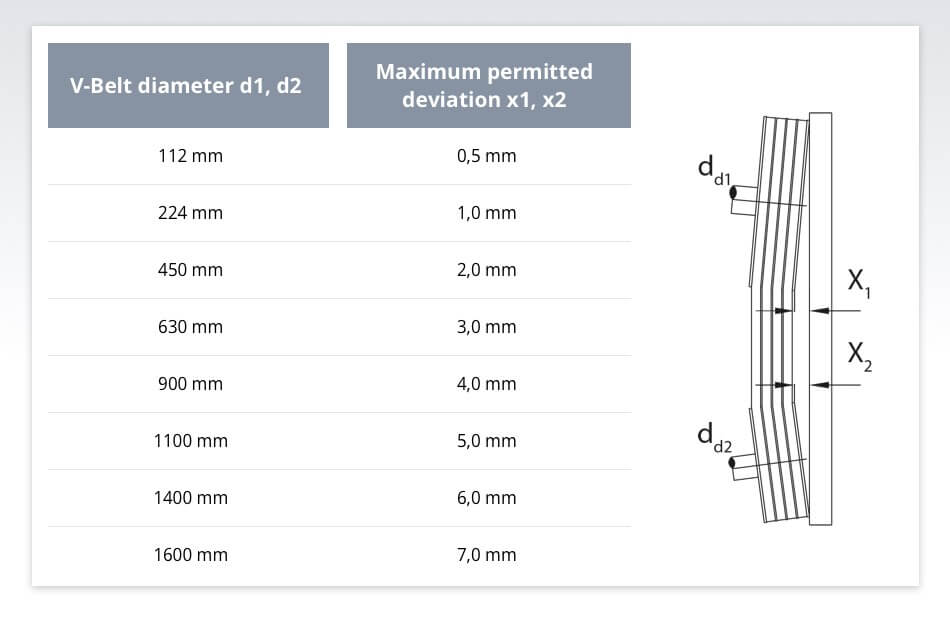
Point 4: Permitted Shaft Deviation
Once tightened correctly, the deviation between both shafts must be checked. The table below contains the values for the permissible pulley deviation:
Point 5: Checking the Drive
It is advisable to check the drive and the V-belts every three to six months. You can use the Optibelt V-belt and groove angle gauge RILLENLKR.
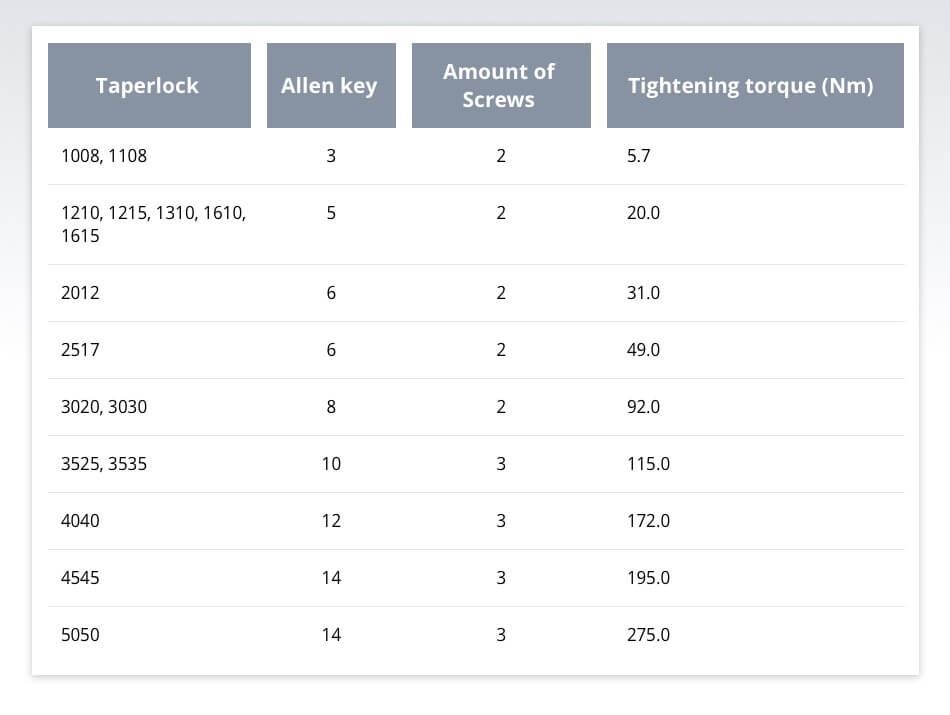
Point 6: V-Belt Pulleys with Taperlock Adjustment Bushes
The V-Belt pulleys are mounted directly onto a shaft or with a taperlock adjustment bush. A taperlock adjustment bush is a conical adjustment bush construction. When installing a V-belt pulley with a taperlock adjustment bush, it is important to use degreased material. In addition, it is important to tighten the adjusting bolts to the correct tightening torque. In this table you will find the most important information:
Repairing or replacing V-belts
Are the V-Belts on your machine damaged, but you suspect that the damage is reparable? Read this article on 'The Nine Most Common Causes of a Broken V-Belt' and how you can prevent or resolve damage.
Are you doing the job yourself? In this article we offer some advice on how to do this and how to choose the right belt.
Do you have more questions? Please contact one of our product specialists, find a Kramp dealer near you or contact us at knowledgecenter@kramp.com.